telegram是一款很好的聊天软件,支持强大的diy功能,免费提供数万人的群。但近两年开始,大陆无法正常登录,所以官方研发了mtproro。然而,没过多久,mtproto已经被某高级数据包过滤系统识别,自己搭建的mtproto proxy数日就会被识别封杀ip,于是官方有了mtproto2.0协议,其一大特点是伪装成https、wss流量,躲过DPI检测。这里我就以debian9为系统,使用docker搭建一个支持加密、流量伪装、特征隐藏的mtproto proxy。
一、环境。
安装好docker,安装教程在此。需要的docker镜像为seriyps/mtproto-proxy。它有以下特点:
- 随机包大小躲避DPI检测。
- 流量伪装躲过DPI检测。
- 强制加密。
- 连接限制策略,支持ip白名单黑名单。
- 多端口,各端口独立加密。
- 高性能,支持C10K。使用1Gbps网络,4核8G内存可以支持90k连接。
- 支持多路复用,(telegram客户端——》proto proxy代理服务器——》telegram服务器),其中proto proxy代理服务器将大量连接整合为少量连接,然后连接到telegram服务器,减轻服务器压力。
- 重放攻击保护(这就是前段时间世界最强ddos攻击的原理,达到TB级)。
- 自动加载telegram配置。
- 支持ipv6连接。
- 所有配置更新不需要重启服务器。
- 缩减代码量,而且包含自动化测试代码。
- 大量状态指标。
二、配置安装。
首先你需要向telegram官方注册你的服务器,假设我的ip为1.1.1.1,1234端口作为代理端口。和官方@MTProxybot对话,获取你的key。
流程如下:
1
2
3
4
5
6
7
8
9
10
11
12
13
14
15
16
17
18
19
20
21
22
23
24
25
26
27
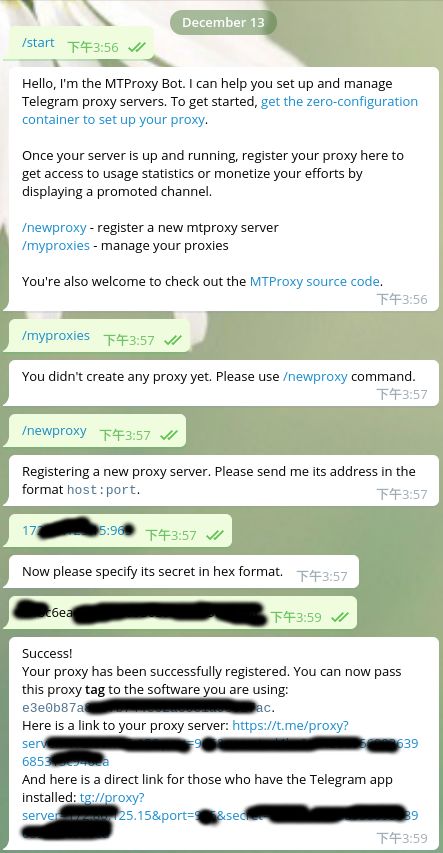
- 我:/start
- tg:"Hello, I'm the MTProxy Bot. I can help you set up and manage Telegram proxy servers. To get started, get the zero-configuration container to set up your proxy (https://hub.docker.com/r/telegrammessenger/proxy/).
Once your server is up and running, register your proxy here to get access to usage statistics or monetize your efforts by displaying a promoted channel.
/newproxy - register a new mtproxy server
/myproxies - manage your proxies
You're also welcome to check out the MTProxy source code (https://github.com/TelegramMessenger/MTProxy)."
- 我:/newproxy
- tg:Registering a new proxy server. Please send me its address in the format host:port.
- 我:1.1.1.1:1234
(此处就是我的ip和端口)
- tg:Now please specify its secret in hex format.
- 我:d4bc6ea42ba956093639685315c946ea
(此处我运行的`$ echo "3F8H@#$FwefQ234@#$1f@fs" | md5sum`得到的32位md5,你也可以随便找个md5生成的网站做一个32位16进制的字符串,也可以自己随意输入32位0-9,a-f的字符)
- tg:Success!
Your proxy has been successfully registered. You can now pass this proxy tag to the software you are using: e3*************************7ac.
Here is a link to your proxy server: https://t.me/proxy?server=1.1.1.1&port=1234&secret=d4bc***********6ea
(此处e3*****7ac为我们得到的key,下面的链接在telegram中点击就会自动设置代理,此时不要点击,我们的加密方案此连接无效)
现在我们得到了e3*****7ac32位key,然后开始配置服务器,现在到服务器上运行:
1
2
3
4
5
6
7
8
9
10
11
12
13
14
15
16
17
18
19
20
root@host:~# echo "52H@#$Ffef@#4@#$1f@fs" | md5sum
b41c652b61014f1f895721981c66e937  -

root@host:~# docker run -d --network=host seriyps/mtproto-proxy -p 1234 -s b41c652b61014f1f895721981c66e937 -t e3*****7ac -a dd -a tls
52523516f19142351235b8fcf20a3463427347240e19d7fb632623423523

root@hostlocboy:~# docker logs 52523516f19142351235b8fcf20a3463427347240e19d7fb632623423523

Exec: /opt/mtp_proxy/erts-10.3.5.6/bin/erlexec -noshell -noinput +Bd -boot /opt/mtp_proxy/releases/0.1.0/mtp_proxy -mode embedded -boot_var ERTS_LIB_DIR /opt/mtp_proxy/lib -config /opt/mtp_proxy/releases/0.1.0/sys.config -args_file /opt/mtp_proxy/releases/0.1.0/vm.args -- foreground -mtproto_proxy allowed_protocols [mtp_fake_tls,mtp_secure] -mtproto_proxy ports [#{name => mtproto_proxy, port => 965, secret => <<"b41c652b61014f1f895721981c66e937">>, tag => <<"e3*****7ac">>}]
Root: /opt/mtp_proxy
/opt/mtp_proxy
+++++++++++++++++++++++++++++++++++++++
Erlang MTProto proxy by @seriyps https://github.com/seriyps/mtproto_proxy
Sponsored by and powers @socksy_bot

Proxy started on 0.0.0.0:1234 with secret: b41c652b61014f1f895721981c66e937, tag: e3*****7ac
Links:
https://t.me/proxy?server=1.1.1.1.1&port=1234&secret=eeb41c652b61014f1f895721981c66e93773332e61**********36f6d
https://t.me/proxy?server=1.1.1.1&port=1234&secret=ddb41c652b61014f1f895721981c66e937
注意这里的e3*****7ac,中间***是我为了避免我的key泄漏所以替换成了星号,你应该是个32位16进制字符串,就像b41c652b61014f1f895721981c66e937一样。这里的-a dd是随机数据包大小,隐藏特征用的,-a tls为强制加密。
看到最下面两个连接就是我们需要的服务器链接,用第一个https://t.me/proxy?server=1.1.1.1.1&port=1234&secret=eeb41c652b61014f1f895721981c66e93773332e61**********36f6d就好,复制到telegram中,然后点击,telegram就会自动设置好代理连接上了。
总结。
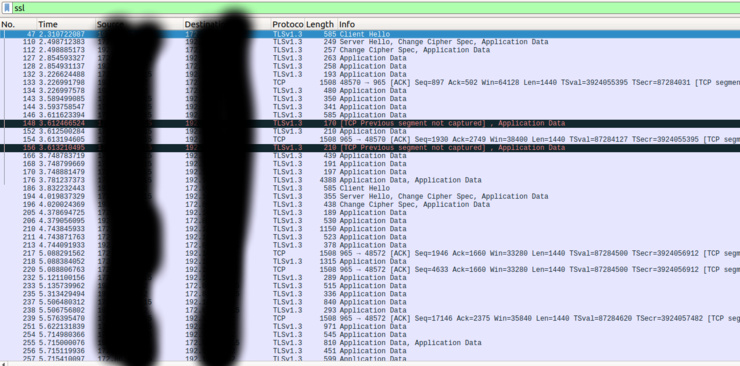
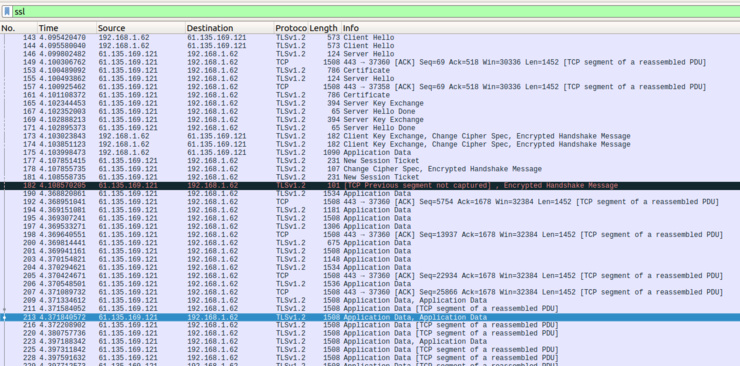
最后,看下浏览器打开百度和使用tg抓包的图,telegram使用了tls1.3。
百度:
telegram: