Github Actions,github新出的自动化执行环境,原理是使用虚拟服务器,我们通过在git库里添加特定文件,让github自动调用我们配置的文件在虚拟服务器中执行。本文从零开始,使用lede和KFERMercer/OpenWrt-CI项目,基于glinet-usb150一步一步制作出需要的固件,学会了方法,你就可以直接编译自己硬件相关的固件。
参考项目:
参考文章:
【教程】会本地编译的情况下,怎么用GitHub Actions云编译?
SSH 连接到 GitHub Actions 虚拟服务器环境
开始前先感谢以上大佬详细又通俗易懂的图文教程,在看下面的内容之前,推荐先看《GitHub Actions 入门教程》,本博客是对他们的总结和对不清楚的步骤进行了详细说明。
一、Github Actions介绍
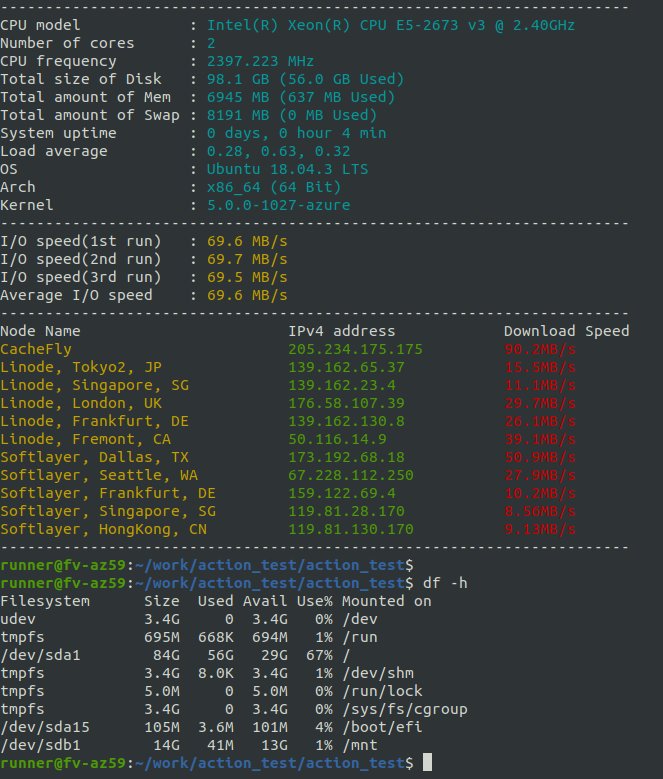
github为每个公开项目提供了免费的actions服务,给每个私有项目提供了有限的免费服务和收费服务。它的硬件配置如下:
Ubuntu-latest,配置是E5-2673 V3 @ 2.40GHz,双核7G内存,带宽1Gbps,磁盘根目录给了84G,可用30G,额外给了/mnt目录14G存储。值得注意的是,Ubuntu可以同时编译20个工作流,真香。
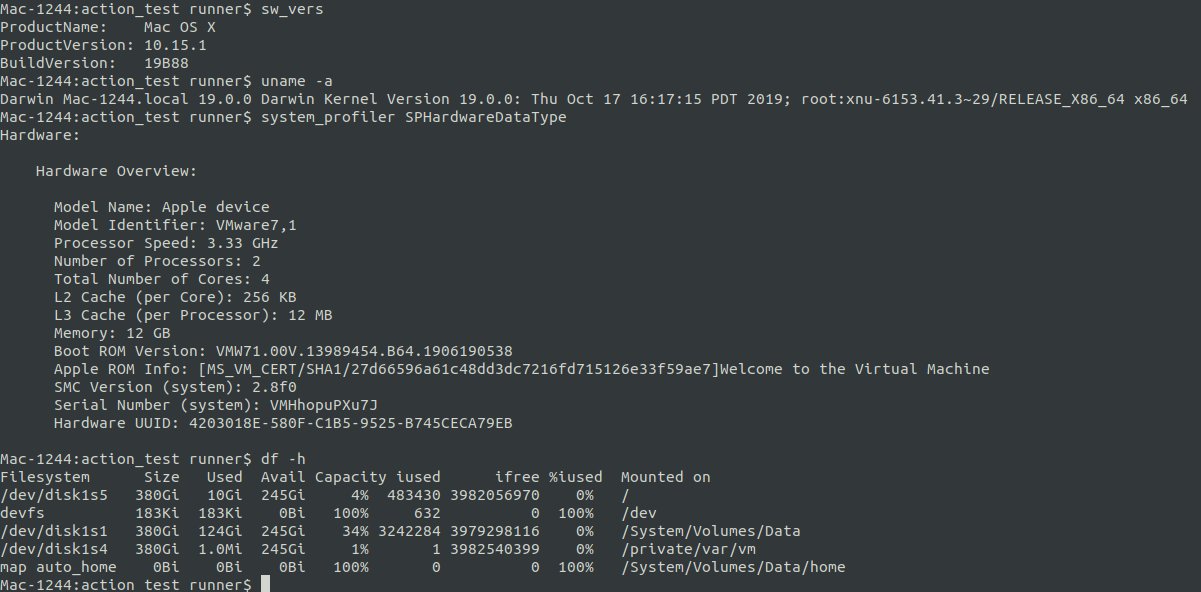
Macos-latest,苹果系统配置就更厉害了,3.33GHz的CPU,2核4线程,12G内存,根目录给了380G存储,245G可用,额外还给了/System/Volumes/Data目录380G,245G可用。都让开,扶我起来我要用MacOS :)。
Windows我就没测了。服务器是微软的弗吉尼亚州节点。
二、编译说明
这里我推荐你优先学习一下如何在本地编译,因为需要制作出来自己的.config配置文件。可以阅读我的《一步一步编译openwrt详细说明》,以及参考文章的《使用 GitHub Actions 编译 OpenWrt》和【教程】会本地编译的情况下,怎么用GitHub Actions云编译?。
三、从零开始制作本地.config差异文件
这里假设你通过《一步一步编译openwrt详细说明》在本地编译成功了,那么现在我们只需要和默认配置文件diffconfig出来的差异文件seed.config。当然不要直接拿项目根目录的.config,它太大了。现在我们从零开始制作seed.config。
1、首先克隆lede项目,并获取需要的feeds。
1
2
3
4
vagrant@vagrant-ubuntu-trusty-64:~$ git clone https://github.com/coolsnowwolf/lede
vagrant@vagrant-ubuntu-trusty-64:~$ cd lede/
vagrant@vagrant-ubuntu-trusty-64:~/lede$ ./scripts/feeds update -a
vagrant@vagrant-ubuntu-trusty-64:~/lede$ ./scripts/feeds install -a
2、配置.config,获取差异文件。
由于我的硬件是Gl.inet-usb150,所以我先选择我的硬件,然后保存退出。
1
2
vagrant@vagrant-ubuntu-trusty-64:~/lede$ make defconfig
vagrant@vagrant-ubuntu-trusty-64:~/lede$ make menuconfig
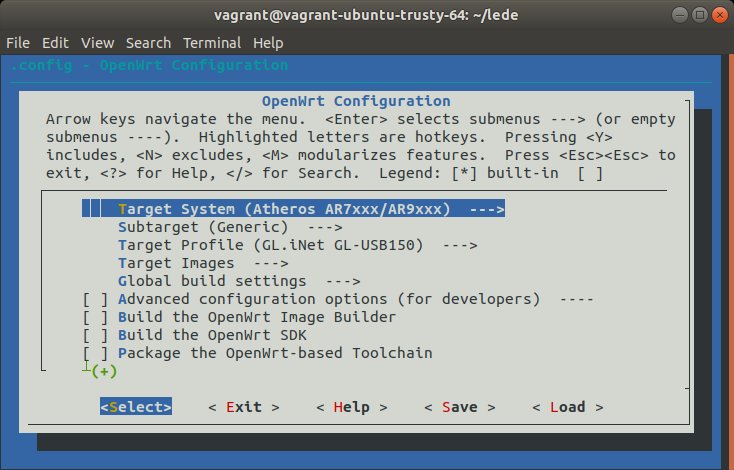
可以看到我只选择了:
1
2
3
4
Target System ()
    Atheros AR7xxx/AR9xxx 选择
Target Profile
    GL.iNet GL-USB150 选择
保存退出来,然后我们生成我们第一个seed.config。
1
2
3
4
5
6
vagrant@vagrant-ubuntu-trusty-64:~/lede$ ./scripts/diffconfig.sh > seed1.config
vagrant@vagrant-ubuntu-trusty-64:~/lede$ cat seed1.config
CONFIG_TARGET_ar71xx=y
CONFIG_TARGET_ar71xx_generic=y
CONFIG_TARGET_ar71xx_generic_DEVICE_gl-usb150=y
可以看到,当我们选择了这两项时,其实是选择了CONFIG_TARGET_ar71xx、CONFIG_TARGET_ar71xx_generic、CONFIG_TARGET_ar71xx_generic_DEVICE_gl-usb150三项,其中第二项是被第一项连带选上的。现在我们可以直接那这个文件去OpenWrt-CI中使用,但是我还想配置一点别的,例如关闭ftp。
3、可选,关闭ftp。此步骤和步骤2是相同的,但是有些特殊说明。
同样我们通过make menuconfig取消ftp选项。
1
2
3
LuCI
    Applications
        luci-app-vsftpd 取消
然后我们生成seed2.config。
1
2
3
4
5
6
7
8
vagrant@vagrant-ubuntu-trusty-64:~/lede$ ./scripts/diffconfig.sh > seed2.config
vagrant@vagrant-ubuntu-trusty-64:~/lede$ cat seed2.config
CONFIG_TARGET_ar71xx=y
CONFIG_TARGET_ar71xx_generic=y
CONFIG_TARGET_ar71xx_generic_DEVICE_gl-usb150=y
# CONFIG_PACKAGE_luci-app-vsftpd is not set
CONFIG_PACKAGE_vsftpd-alt=y
CONFIG_VSFTPD_USE_UCI_SCRIPTS=y
可以看见,相对于seed1.config,增加了三行,# CONFIG_PACKAGE_luci-app-vsftpd is not set是我们取消的vsftpd,但是后面两项却因为我们的取消而自动选中了,坑爹的就是这个地方,所以我们还要去menuconfig找到vsftpd-alt和vfstpd uci scripts取消掉。
1
2
3
4
Network
    File Transfer
        vsftpd-alt  取消
        [*] Use UCI scripts 会被vsftpd-alt的取消自动消失
现在再生成新的seed3.config。
1
2
3
4
5
6
7
vagrant@vagrant-ubuntu-trusty-64:~/lede$ ./scripts/diffconfig.sh > seed3.config
vagrant@vagrant-ubuntu-trusty-64:~/lede$ cat seed3.config
CONFIG_TARGET_ar71xx=y
CONFIG_TARGET_ar71xx_generic=y
CONFIG_TARGET_ar71xx_generic_DEVICE_gl-usb150=y
# CONFIG_PACKAGE_luci-app-vsftpd is not set
# CONFIG_PACKAGE_vsftpd-alt is not set
前面的luci-app-vsftpd取消了,自动选中的vsftpd-alt也被我们刚才取消了,CONFIG_VSFTPD_USE_UCI_SCRIPTS因为我们取消了vsftpd-alt,所以自动消失,因为没有=y,所以它不会编译上。
就是这样反复一步一步,选择我们需要的配置,关闭我们不要的配置,最终生成我们需要的最终seed.config配置文件,我的是seed13.config。。
1
2
3
4
5
6
7
8
9
10
11
12
13
14
15
16
17
18
19
20
vagrant@vagrant-ubuntu-trusty-64:~/lede$ cat seed13.config
CONFIG_TARGET_ar71xx=y
CONFIG_TARGET_ar71xx_generic=y
CONFIG_TARGET_ar71xx_generic_DEVICE_gl-usb150=y
CONFIG_PACKAGE_ca-certificates=y
# CONFIG_PACKAGE_kmod-crypto-arc4 is not set
# CONFIG_PACKAGE_kmod-crypto-ecb is not set
# CONFIG_PACKAGE_kmod-crypto-sha1 is not set
# CONFIG_PACKAGE_kmod-gpio-button-hotplug is not set
# CONFIG_PACKAGE_kmod-gre is not set
# CONFIG_PACKAGE_kmod-lib-crc-ccitt is not set
# CONFIG_PACKAGE_kmod-ppp is not set
# CONFIG_PACKAGE_luci-app-pptp-server is not set
CONFIG_PACKAGE_luci-app-ssr-plus_INCLUDE_V2ray=y
# CONFIG_PACKAGE_luci-app-vsftpd is not set
# CONFIG_PACKAGE_ppp is not set
# CONFIG_PACKAGE_pptpd is not set
# CONFIG_PACKAGE_shellsync is not set
CONFIG_PACKAGE_v2ray=y
# CONFIG_PACKAGE_vsftpd-alt is not set
三、配置自己的openwrt/lede github actions
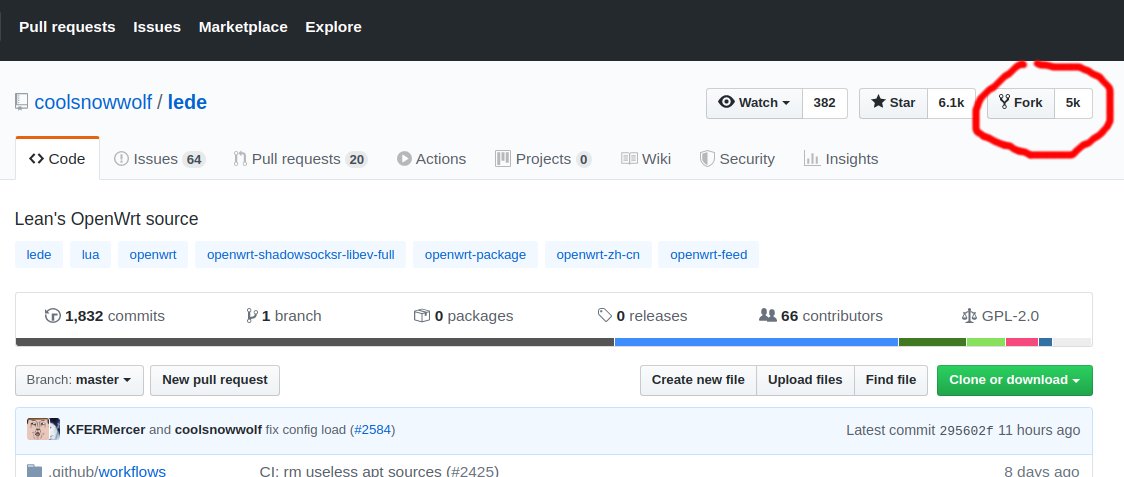
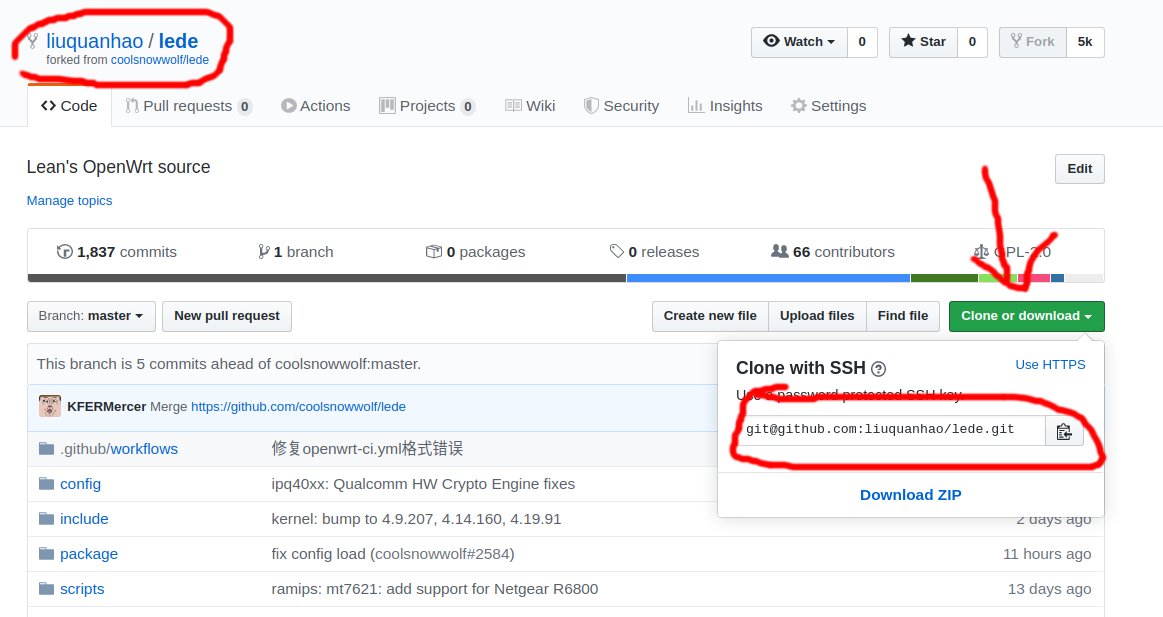
首先需要在github上fork作者的lede,因为我们最终是要在自己的actions下执行编译。
然后clone自己的lede库到本地,下面的git地址替换成你自己的。
1
liuxu:~/source/git/github_actions$ git clone git@github.com:liuquanhao/lede.git
然后cloneOpenWrt-CI项目。
1
liuxu:~/source/git/github_actions$ https://github.com/KFERMercer/OpenWrt-CI.git
现在我们本地就有了2个库,一个是fork到自己账号的lede库,一个是KFERMercer的OpenWrt-CI库。
1
2
3
4
5
6
7
8
9
10
11
12
13
14
15
16
17
18
19
20
21
22
liuxu:~/source/git/github_actions$ ll
total 20
drwxr-xr-x  5 liuxu liuxu 4096 12月 26 16:44 ./
drwxr-xr-x 12 liuxu liuxu 4096 12月 25 17:53 ../
drwxr-xr-x 11 liuxu liuxu 4096 12月 26 19:22 lede/
drwxr-xr-x  3 liuxu liuxu 4096 12月 26 16:39 OpenWrt-CI/
liuxu:~/source/git/github_actions$ ll lede/.github/workflows/
total 24
drwxr-xr-x 2 liuxu liuxu 4096 12月 26 19:17 ./
drwxr-xr-x 3 liuxu liuxu 4096 12月 26 16:45 ../
-rw-r--r-- 1 liuxu liuxu  844 12月 26 19:17 merge-upstream.yml
-rw-r--r-- 1 liuxu liuxu 8649 12月 26 19:17 openwrt-ci.yml
liuxu:~/source/git/github_actions$ ll OpenWrt-CI/
total 40
drwxr-xr-x 3 liuxu liuxu 4096 12月 26 16:39 ./
drwxr-xr-x 5 liuxu liuxu 4096 12月 26 16:44 ../
drwxr-xr-x 8 liuxu liuxu 4096 12月 26 16:40 .git/
-rw-r--r-- 1 liuxu liuxu 1093 12月 26 16:18 LICENSE
-rw-r--r-- 1 liuxu liuxu  844 12月 26 16:38 merge-upstream.yml
-rw-r--r-- 1 liuxu liuxu 8651 12月 26 16:39 openwrt-ci.yml
-rw-r--r-- 1 liuxu liuxu  660 12月 26 16:18 README-en.md
-rw-r--r-- 1 liuxu liuxu 3671 12月 26 16:18 README.md
然后我们把OpenWrt-CI/目录下的merge-upstream.yml和openwrt-ci.yml覆盖掉lede/.github/workflows/目录的merge-upstream.yml和openwrt-ci.yml。
1
liuxu:~/source/git/github_actions$ cp OpenWrt-CI/merge-upstream.yml OpenWrt-CI/merge-upstream.yml lede/.github/workflows/
然后我们到lede/.github/workflows/目录下进行修改。编辑openwrt-ci.yml文件,在- name: Generate configuration file下面,有“固件定制部分”,一直到“固件定制部分结束”都是被注释的。默认配置了好几个,也做了说明,如果我们想编译x64硬件的固件,只需要取消“# 编译x64固件:”下面的注释符就行,像这样:
1
2
3
4
5
6
# 编译x64固件:
cat >> .config <<EOF
CONFIG_TARGET_x86=y
CONFIG_TARGET_x86_64=y
CONFIG_TARGET_x86_64_Generic=y
EOF
但是我们不需要这这些配置,因为我们有自己的seed.config。所以可以把“固件定制部分”到“固件定制部分结束”中间的配置都删了,也可以不管它,我们直接添加我们的配置。现在我们在“固件定制部分结束”之前添加下面的配置:
1
2
3
4
5
6
7
8
9
10
11
12
13
14
15
16
17
18
19
20
21
22
# Gl.inet usb-150固件配置:
cat >> .config <<EOF
CONFIG_TARGET_ar71xx=y
CONFIG_TARGET_ar71xx_generic=y
CONFIG_TARGET_ar71xx_generic_DEVICE_gl-usb150=y
CONFIG_PACKAGE_ca-certificates=y
# CONFIG_PACKAGE_kmod-crypto-arc4 is not set
# CONFIG_PACKAGE_kmod-crypto-ecb is not set
# CONFIG_PACKAGE_kmod-crypto-sha1 is not set
# CONFIG_PACKAGE_kmod-gpio-button-hotplug is not set
# CONFIG_PACKAGE_kmod-gre is not set
# CONFIG_PACKAGE_kmod-lib-crc-ccitt is not set
# CONFIG_PACKAGE_kmod-ppp is not set
# CONFIG_PACKAGE_luci-app-pptp-server is not set
CONFIG_PACKAGE_luci-app-ssr-plus_INCLUDE_V2ray=y
# CONFIG_PACKAGE_luci-app-vsftpd is not set
# CONFIG_PACKAGE_ppp is not set
# CONFIG_PACKAGE_pptpd is not set
# CONFIG_PACKAGE_shellsync is not set
CONFIG_PACKAGE_v2ray=y
# CONFIG_PACKAGE_vsftpd-alt is not set
EOF
然后我配置了触发编译条件为push了master分支和每周五早上8点编译,时间是UTC时间,北京时间是它的基础上加8小时。
1
2
3
4
5
6
on:
  push:
    branches:
      - master
  schedule:
    - cron: 0 0 * * 5
最后的配置文件是这样,我为了减少篇幅,删除了注释和空行:
1
2
3
4
5
6
7
8
9
10
11
12
13
14
15
16
17
18
19
20
21
22
23
24
25
26
27
28
29
30
31
32
33
34
35
36
37
38
39
40
41
42
43
44
45
46
47
48
49
50
51
52
53
54
55
56
57
58
59
60
61
62
63
64
65
66
67
68
69
70
71
72
73
74
75
76
77
78
79
80
81
82
83
84
85
86
87
88
89
name: OpenWrt-CI
on:
  push:
    branches:
      - master
  schedule:
    - cron: 0 0 * * 5
jobs:
  build:
    runs-on: ubuntu-latest
    steps:
      - name: Checkout
        uses: actions/checkout@master
        with:
          ref: master
      - name: Space cleanup
        env:
          DEBIAN_FRONTEND: noninteractive
        run: |
          docker rmi `docker images -q`
          sudo rm -rf /usr/share/dotnet /etc/mysql /etc/php /etc/apt/sources.list.d
          sudo -E apt-get -y purge azure-cli ghc* zulu* hhvm llvm* firefox google* dotnet* powershell openjdk* mysql* php*
          sudo -E apt-get update
          sudo -E apt-get -y install build-essential asciidoc binutils bzip2 gawk gettext git libncurses5-dev libz-dev patch unzip zlib1g-dev lib32gcc1 libc6-dev-i386 subversion flex uglifyjs git-core gcc-multilib p7zip p7zip-full msmtp libssl-dev texinfo libglib2.0-dev xmlto qemu-utils upx libelf-dev autoconf automake libtool autopoint device-tree-compiler
          sudo -E apt-get -y autoremove --purge
          sudo -E apt-get clean
          # sudo mkdir -p -m 777 /mnt/openwrt/bin /mnt/openwrt/build_dir/host /mnt/openwrt/build_dir/hostpkg /mnt/openwrt/dl /mnt/openwrt/feeds /mnt/openwrt/staging_dir
          # ln -s /mnt/openwrt/bin ./bin
          # mkdir -p ./build_dir/host && ln -s /mnt/openwrt/build_dir/host ./build_dir/host
          # mkdir -p ./build_dir/host && ln -s /mnt/openwrt/build_dir/hostpkg ./build_dir/hostpkg
          # ln -s /mnt/openwrt/dl ./dl
          # ln -s /mnt/openwrt/feeds ./feeds
          # ln -s /mnt/openwrt/staging_dir ./staging_dir
          df -h
      - name: Update feeds
        run: |
          ./scripts/feeds update -a
          ./scripts/feeds install -a
      - name: Generate configuration file
        run: |
          rm -f ./.config*
          touch ./.config
          # Gl.inet usb-150固件配置:
          cat >> .config <<EOF
          CONFIG_TARGET_ar71xx=y
          CONFIG_TARGET_ar71xx_generic=y
          CONFIG_TARGET_ar71xx_generic_DEVICE_gl-usb150=y
          CONFIG_PACKAGE_ca-certificates=y
          # CONFIG_PACKAGE_kmod-crypto-arc4 is not set
          # CONFIG_PACKAGE_kmod-crypto-ecb is not set
          # CONFIG_PACKAGE_kmod-crypto-sha1 is not set
          # CONFIG_PACKAGE_kmod-gpio-button-hotplug is not set
          # CONFIG_PACKAGE_kmod-gre is not set
          # CONFIG_PACKAGE_kmod-lib-crc-ccitt is not set
          # CONFIG_PACKAGE_kmod-ppp is not set
          # CONFIG_PACKAGE_luci-app-pptp-server is not set
          CONFIG_PACKAGE_luci-app-ssr-plus_INCLUDE_V2ray=y
          # CONFIG_PACKAGE_luci-app-vsftpd is not set
          # CONFIG_PACKAGE_ppp is not set
          # CONFIG_PACKAGE_pptpd is not set
          # CONFIG_PACKAGE_shellsync is not set
          CONFIG_PACKAGE_v2ray=y
          # CONFIG_PACKAGE_vsftpd-alt is not set
          EOF
          sed -i 's/^[ \t]*//g' ./.config
          make defconfig
      - name: Make download
        run: |
          make download -j8
          find ./dl/ -size -1024c -exec rm -f {} \;
          df -h
      - name: Compile firmware
        run: |
          make -j$(nproc) || make -j1 V=s
          echo "======================="
          echo "Space usage:"
          echo "======================="
          df -h
          echo "======================="
          du -h --max-depth=1 ./ --exclude=build_dir --exclude=bin
          du -h --max-depth=1 ./build_dir
          du -h --max-depth=1 ./bin
      - name: Prepare artifact
        run: find ./bin/targets/ -type d -name "packages" | xargs rm -rf {}
      - name: Upload artifact
        uses: actions/upload-artifact@master
        with:
          name: OpenWrt firmware
          path: ./bin/targets/
最后提交push就可以了。
1
2
3
liuxu:~/source/git/github_actions/lede$ git add .
liuxu:~/source/git/github_actions/lede$ git commit -m "编译glinet usb150"
liuxu:~/source/git/github_actions/lede$ git push
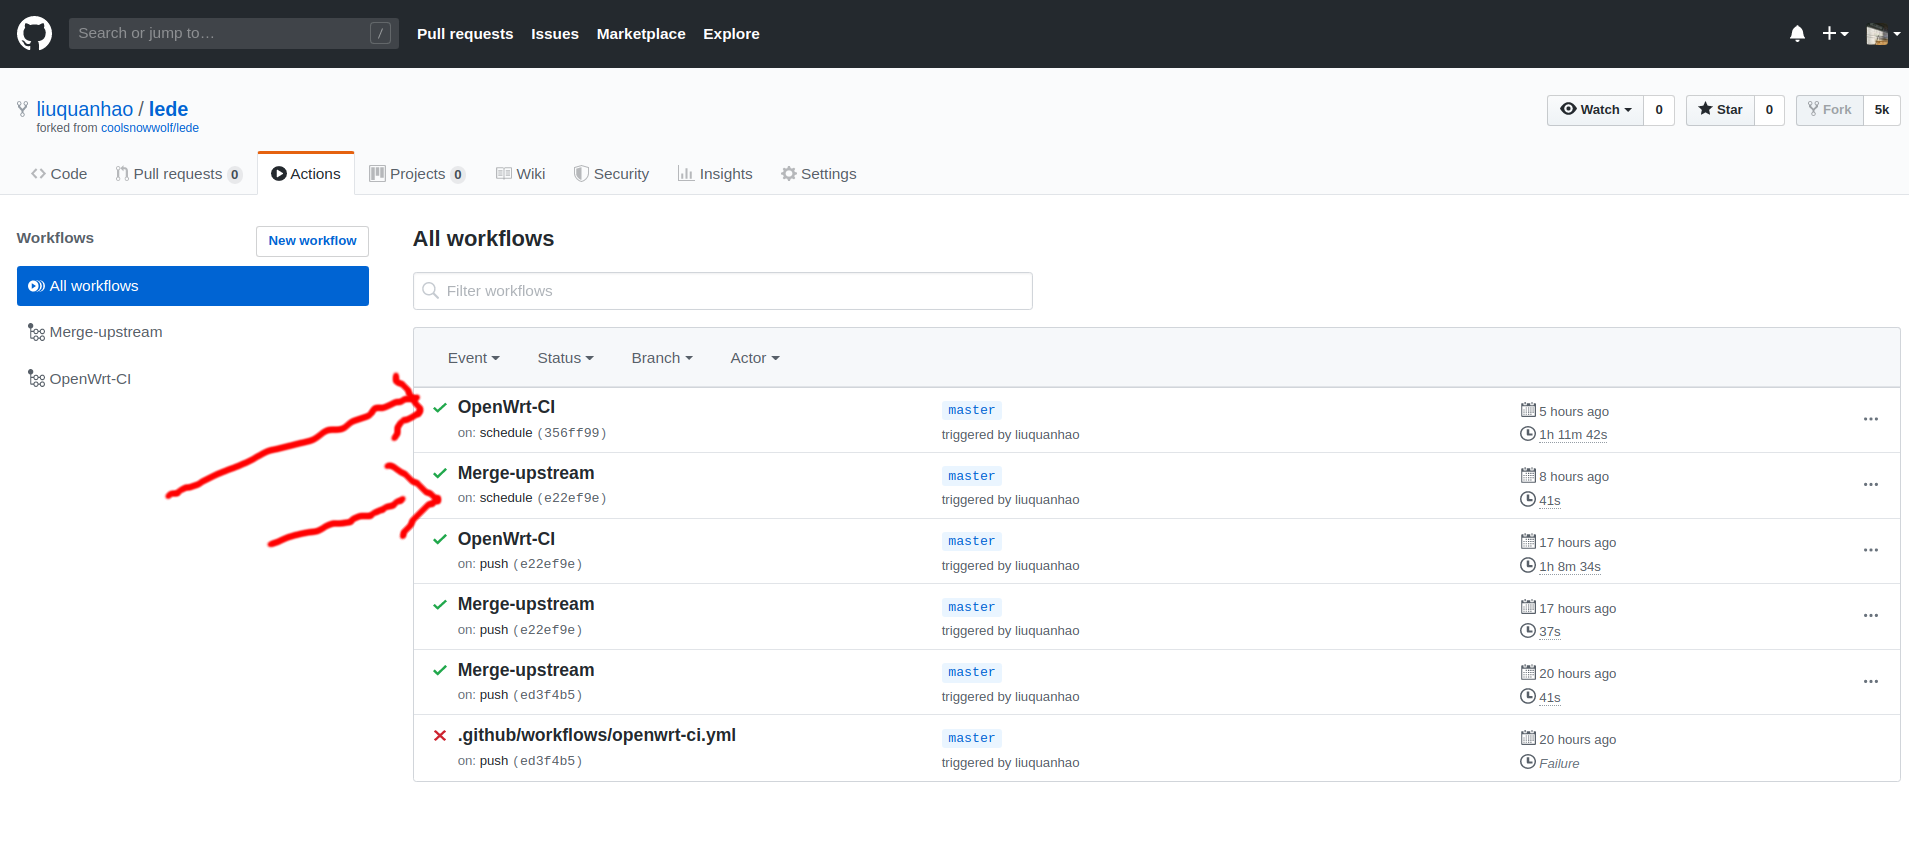
因为我们设置了push触发编译,所以马上编译了,同时以后每周五早上8点也会开始编译。然后就可以到我们的lede项目下看看actions执行情况。

因为我编译了很多次,所以你会看到好几个,这次是“Merge-upstream”花了41秒(还记得我们替换了2个文件吧,每个文件是一个workflow),“OpenWrt-CI”编译花了1小时11分42秒。
四、总结
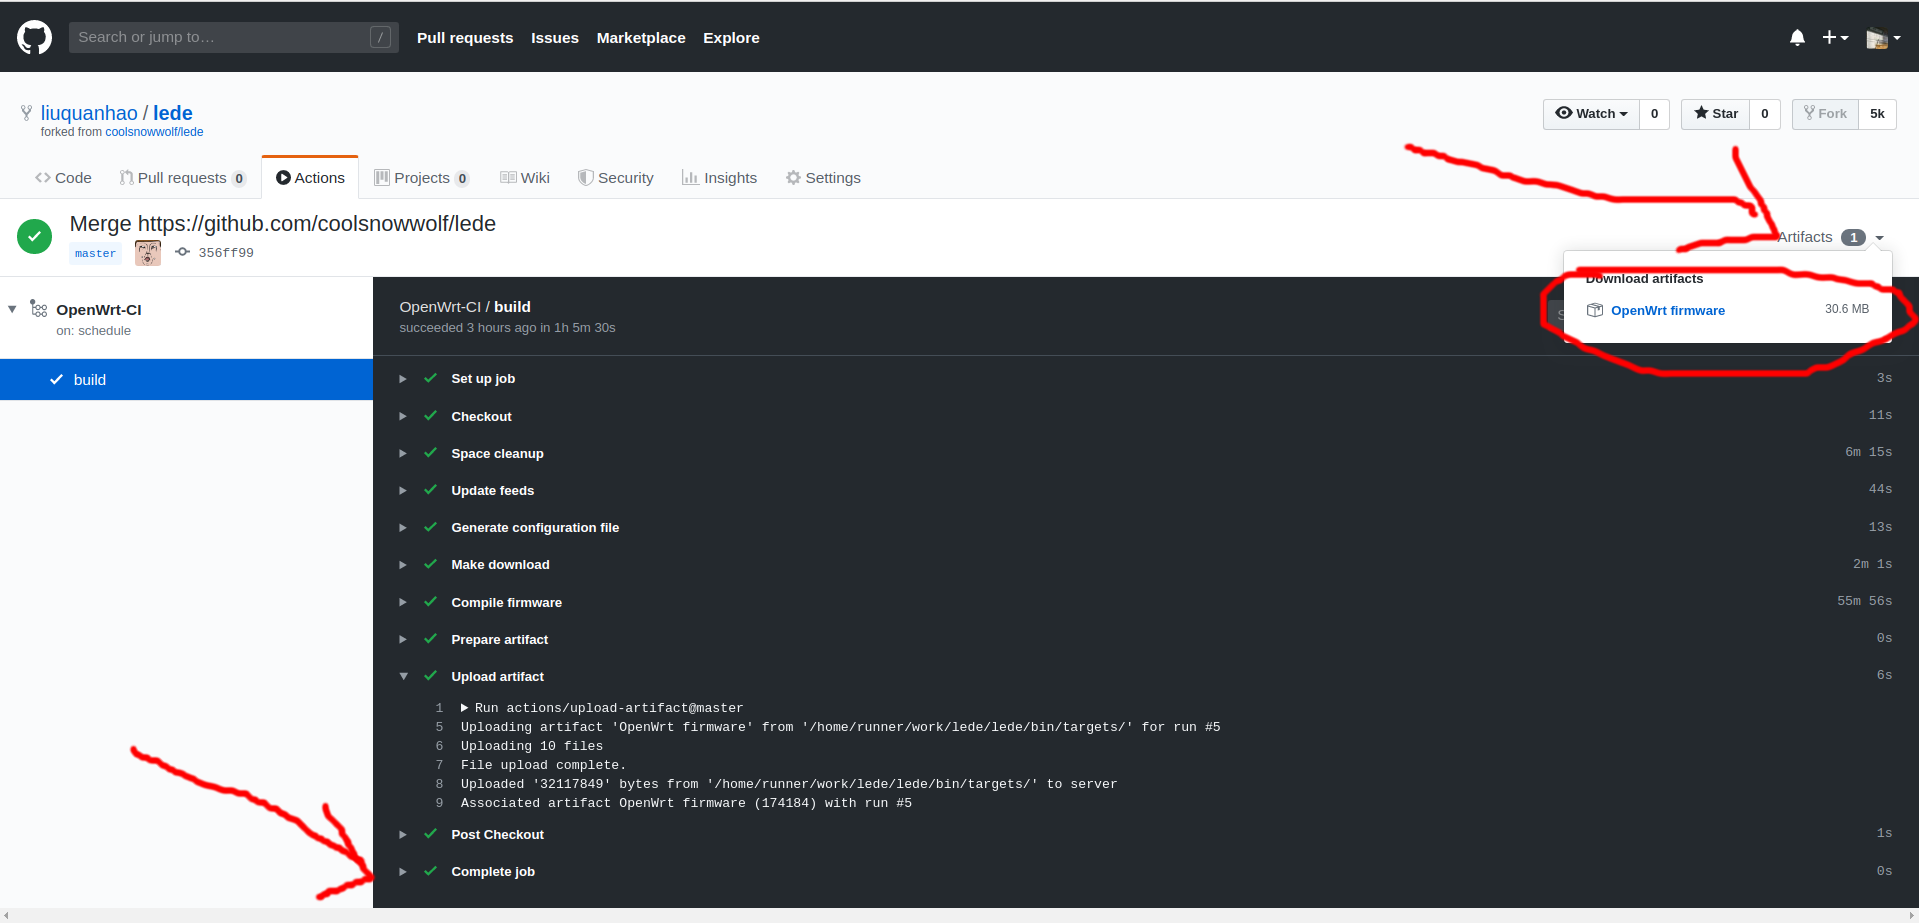
最后我们下载OpenWrt firmware.zip文件,可以看见我们的固件openwrt-ar71xx-generic-gl-usb150-squashfs-sysupgrade.bin已经编译好了。
1
2
3
4
5
6
7
8
9
10
11
12
13
14
15
16
liuxu:~/Downloads$ tree OpenWrt\ firmware
OpenWrt firmware
└── ar71xx
    └── generic
        ├── config.seed
        ├── openwrt-ar71xx-generic-gl-usb150.manifest
        ├── openwrt-ar71xx-generic-gl-usb150-squashfs-sysupgrade.bin
        ├── openwrt-ar71xx-generic-root.squashfs
        ├── openwrt-ar71xx-generic-uImage-lzma.bin
        ├── openwrt-ar71xx-generic-vmlinux.bin
        ├── openwrt-ar71xx-generic-vmlinux.elf
        ├── openwrt-ar71xx-generic-vmlinux.lzma
        ├── openwrt-ar71xx-generic-vmlinux-lzma.elf
        └── sha256sums

2 directories, 10 files
以上就是所有过程,如果你要编译自己硬件的固件,其实就是通过“三、从零开始制作本地.config差异文件”配置自己的seed.config。
最后,再次感谢参考部分的各位大佬和OpenWrt项目组。
